
<Back> 1 2 3 4 5 6 7 8 9 <Next>
In Part 3 of the tutorial, we are going to learn how to color the fractal using the Orbit Trap Controllers.
Execute the Reset to Defaults command on the File menu of the Fractal Window.
Select the General properties page:
Turn on Anti-Aliasing by setting Oversampling to 3x3 Oversampling in the Anti-Aliasing section.

This dramatically increases the space required for sample data and the time required to compute it, and should be used with care. However, since we will spend most of our time working with the controllers in this part of the tutorial, the Processing Optimization performed by the Fractal Science Kit will skip the sample generation step for all but 1 of the display requests.
Next, select the Mandelbrot / Julia / Newton properties page:
General
Mandelbrot / Julia / Newton
Set Type to Both in the Mandelbrot / Julia/ Newton section of the page and change Process Classic to Generate Data.
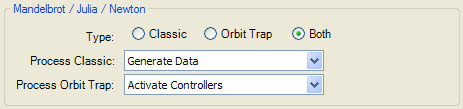
The reason we set Type to Both is because we are going to use the sample's Magnitude field to color the trap in some of our examples later in the tutorial. There are 2 processing subsystems used to process Mandelbrot fractals; the Classic Processor and the Orbit Trap Processor. The Orbit Trap Processor handles all trap related tasks and sets all trap related sample data. The Classic Processor handles everything else. The sample's Magnitude field is set by the Classic Processor, so we need to activate the Classic Processor to access it.
In this example, we only want the Orbit Trap Controllers to color the fractal so we set Process Classic to Generate Data so the Classic Processor computes the sample's Magnitude but the Classic Controllers are not activated.
To illustrate this point, both of the following images were generated with Type set to Both. In the 1st image, both Process Classic and Process Orbit Trap were set to Activate Controllers but in the 2nd image, Process Classic was changed to Generate Data.
|
|
|
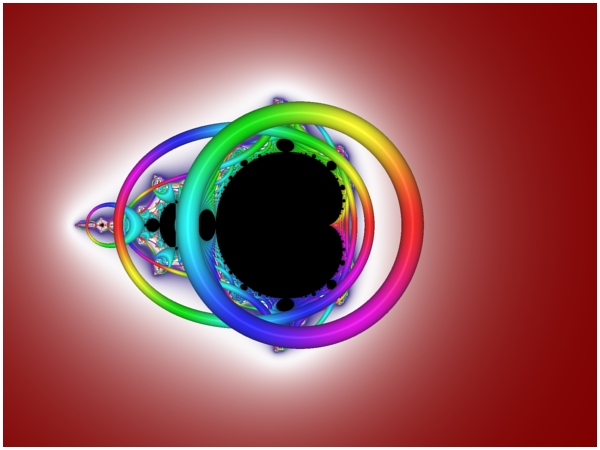

When both Process Classic and Process Orbit Trap are set to Activate Controllers the trap is overlaid on top of the classic image as shown in the 1st image above.
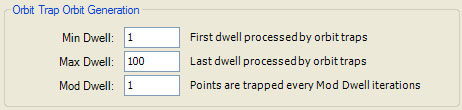
Set Max Dwell to 100 in the Orbit Trap Orbit Generation section.
Next, select the Alternate Mapping 1: <None> properties page:
General
Mandelbrot / Julia / Newton
Alternate Mapping 1: <None>
Set the Type to Minimum Value.

This setting keeps track of the orbit point with the minimum value in each orbit and makes it available to the controllers. Later, we will use this data to color the orbit trap.
Next, select the Properties page in the hierarchy under Alternate Mapping 1: Minimum Value.
General
Mandelbrot / Julia / Newton
Alternate Mapping 1: Minimum Value
Properties
Check Apply Shape to apply the Shape Transformation to each value. This injects a simple orbit trap like quality into the value based on the shape defined by the Shape Transformation.
![]()
Next, select the Shape Transformation properties page.
General
Mandelbrot / Julia / Newton
Alternate Mapping 1: Minimum Value
Shape Transformation
The Shape Transformation page defines a transformation based on a given shape or a blend of 2 shapes. To transform a point, the input point's angular measure relative to the origin is calculated and a delta value is computed by finding the shape's radial measure for the given angle. The delta is applied to the original point to obtain the transformed value. The default is to use a single shape and this is what we will use in the tutorial.
Set the Type in the Shape 1 section to Hyper-Cross A.

This is a modified version of Clifford Pickover's Epsilon Cross method for coloring a fractal (also called Stalks).
Next, select the Orbit Trap Map properties page:
General
Mandelbrot / Julia / Newton
Orbit Trap
Orbit Trap Map
At the top of the page is the list of active orbit traps.
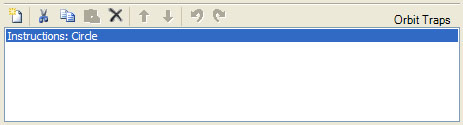
By default, a single orbit trap is defined called Instructions: Circle. We want to use the Circle orbit trap so we need to select the Instructions: Circle item (it is already selected unless you unselected it) and then, in the Selected Orbit Trap Properties section, set Type to Circle.

This is simply an optimized version of Instructions: Circle and is a little faster to generate.
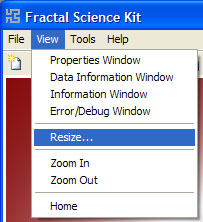
Now we need to zoom into the left side of the Mandelbrot fractal. Normally, you would use the Zoom In box to interactively zoom into the fractal, but we will use the Set Image Viewport dialog so we will all be viewing exactly the same part of the complex plane. To view the dialog, execute the Resize command on the View menu of the Fractal Window.
The Set Image Viewport dialog lets you change the size of the fractal image and the location, size, and orientation, of the viewport onto the complex plane mapped to the image.
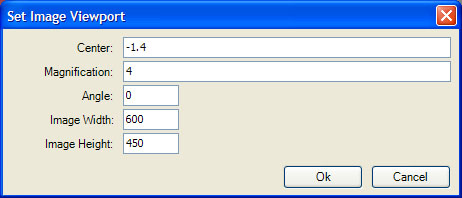
Set Center to -1.4 and Magnification to 4 and click Ok and wait while the application generates the sample data and processes the fractal image shown below. Remember that we set Oversampling to 3x3 Oversampling in the Anti-Aliasing section of the General page so you will need to wait longer than normally would be the case. In fact, since Solid Guessing is automatically disabled when you turn on Anti-Aliasing, the fractal generation processing could take an order of magnitude longer than when Anti-Aliasing is off. On my machine, for example, the following image takes almost 2 minutes to generate compared to 8 seconds, if Anti-Aliasing is turned off. However, as was mentioned before, we will spend most of our time working with the controllers in this part of the tutorial, and the Processing Optimization performed by the Fractal Science Kit will skip the sample generation step for all the remaining display requests so the extra quality is worth the cost.
Next, select the Controllers properties page:
General
Mandelbrot / Julia / Newton
Orbit Trap
Controllers
This page allows you to maintain the list of Color Controllers used to map the sample data to specific colors for display. Typically, you will only use a single controller and will not need to make any changes on this page.
Next, select the Gradient Map - Value properties page:
General
Mandelbrot / Julia / Newton
Orbit Trap
Controllers
Gradient Map - Value
This page is a Program Editor for the Orbit Trap Controller.
Orbit Trap Controllers are programs (called controllers hereafter) that map sample data collected during the fractal iteration, to colors for display. Each controller is composed of a set of properties and Instructions. The properties are in a set of sections at the top of the page and the instructions are at the bottom of the page. To view the instructions, use the editor's Toggle Code View button to hide the properties and expand the instructions to fill the space. See Toolbar Buttons for details.
For each of the controllers we try out in this tutorial, you should read the comments in the program's Instructions. The comments give you a description of what the program does and how to use the program's properties page found below the controller in the hierarchy (usually called Properties).
The default Orbit Trap Controller is Gradient Map - Value.

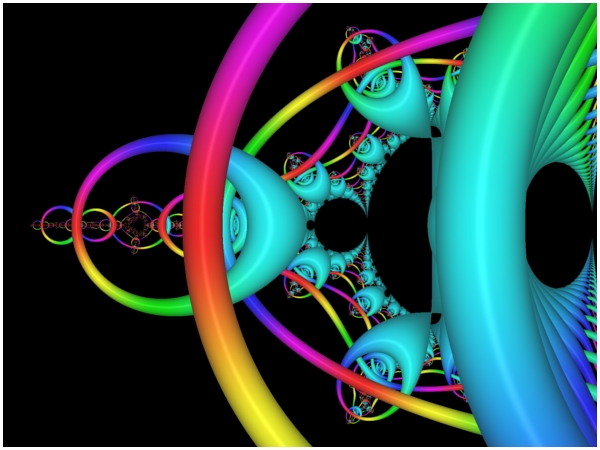
Select the program's Properties page (found below the controller in the hierarchy) and set Color Scheme to 4 Colors - Maroon, Thistle, Linen, Dark Goldenrod and set Value to Magnitude. The Color Scheme setting allows you to choose 1 of the gradients included in the controller's gradient list.

Execute the Display Fractal command on the Tools menu of the Fractal Window to generate the fractal image.
Notice how the sample's Magnitude is painted onto the surface of the orbit trap.
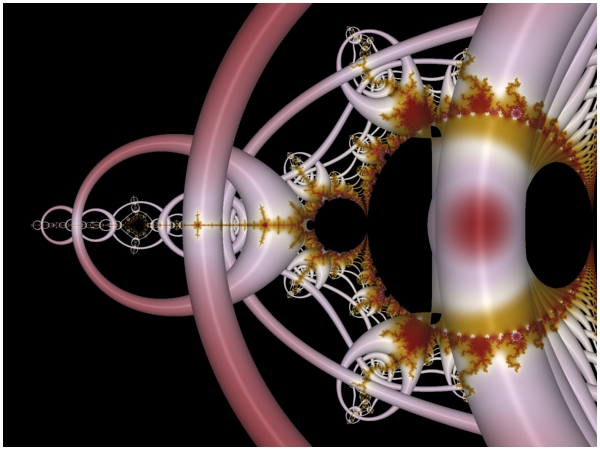
Next, set Color Scheme to 4 Colors - Green, Beige, Tan, Khaki and set Value to Alternate 1 Value.

Execute the Display Fractal command on the Tools menu of the Fractal Window to generate the fractal image.
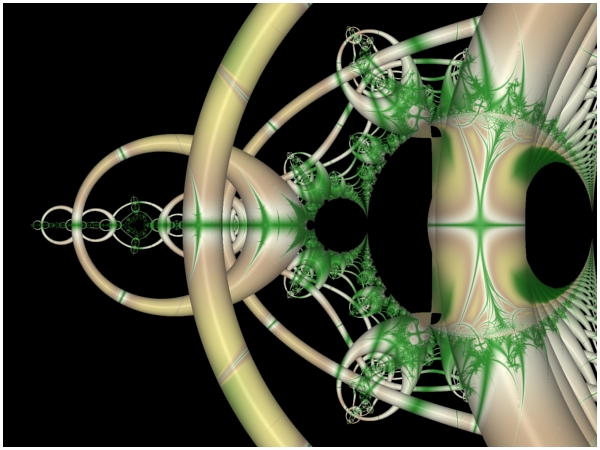
In this image, the sample's Alternate Mapping 1 setting (Minimum Value) is painted onto the trap. By changing the Alternate Mapping 1 you can color the trap in many different ways.