Fractal Science Kit Hints
This page contains a collection of unrelated hints, tips, pointers, etc.
General
Open Documentation Toolbar Button
The Open Documentation toolbar button opens the documentation in your browser to the page that describes the window or the currently selected properties page on the Properties Window. The Open Documentation toolbar button is a small round blue button with a question mark in the center and is the right-most toolbar button on most windows. Those windows that do not have the Open Documentation toolbar button usually have a Help button for this purpose.
Program Comments
The Fractal Science Kit fractal generator comes with hundreds of Built-in Programs which are used to create your fractals. These include equations, transformations, orbit traps, and color controllers. The Program Editors allow you to view/edit a program's Instructions and/or modify a program's properties. At the bottom of each Program Editor is an editor pane that displays the program's Instructions. At the top of the program's instructions is a Comment Section that describes what the program does, and defines all the properties found on the program's properties pages.
Always read the program's comments!
To read the program comments, click Toggle Code View toolbar button at the top of the Program Editor and read the comments given in the comment section of the program's instructions. The comment section contains usage instructions, hints, notes, documentation, and other important information that will help you understand how best to use the program. Once you are done reading the comments, click the Toggle Code View toolbar button again to view the program's properties.
Preview Fractal Toolbar Button
The Preview Fractal toolbar button on the Properties Window generates a preview (in the Preview Window) of the fractal that would result if you were to execute the Display Fractal command on the associated Fractal Window. This is useful when you have made 1 or more changes to the properties and want a quick look at the effects of those changes without incurring the cost of redisplaying the fractal in the full window. If the Zoom In or Zoom Out state is active, the zoom is applied to the preview. The Preview Fractal command is also available on the Tools menu of the associated Fractal Window. If you click on the image in the Preview Window, a new Fractal Window will open with a full-sized version of the preview. See Preview Fractal and Preview Window for details.
Display Fractal in New Window Command
When you are about to Zoom In or Zoom Out and you want to preserve the current fractal, you can set up the Zoom In/Zoom Out box and then execute the Display Fractal in New Window command on the Tools menu of the Fractal Window. This generates a new Fractal Window based on the current values of all the properties associated with the existing Fractal Window and the zoom is applied to the new Fractal Window.
Preview Julia Toolbar Button
The Preview Julia toolbar button on the Fractal Window changes the cursor to a cross and places the Fractal Window into a state where clicking on the Mandelbrot fractal generates a Julia fractal preview in the Preview Window. The point on the Mandelbrot fractal where you click is used as the Julia Constant for the preview. The Preview Julia menu item and toolbar button are disabled on Julia fractals, Orbital fractals, and L-System fractals. If you click on the image in the Preview Window, a new Fractal Window will open with a full-sized version of the preview. See Preview Julia and Preview Window for details.
Gradients
You can open selected gradient files created by other fractal programs (i.e., files named *.ugr). These are converted to a form compatible with the Fractal Science Kit and opened in a read-only Gradient Browser where you can copy selected gradients to your set of saved gradients in My Gradients where they will be accessible to your programs. To open one of these gradient files, use the Open File command on the Fractal Window.
The internet contains a large number of gradients that you can download and use in your explorations. The deviantART group Fractal Resources, for example, has a lot of gradient collections that you can download at Gradient Packs. In most cases you will need to download a .zip file and extract the .ugr file that contains the set of gradients you can load into the Fractal Science Kit as described above.
Information Window
When you click on the fractal image in the Fractal Window, information with respect to the sample point on which you clicked is displayed in the Information Window. Click on Information Window on the View menu on the Fractal Window to view this information. This information is very useful when you are setting up the Color Controllers for a fractal in that you can click on different parts of the fractal and examine the data associated with the different points to guide your decisions with respect to mapping the data to color. For example, an orbit trap may assign different index values to different parts of the trap and you can use this to map different colors to the different parts. By clicking on the trap you can examine which parts have which index values to assist in the index to color mapping.
My Default Fractal
You can control the set of default property values (the set of property values used by the Fractal Science Kit when you open a new Fractal Window) by creating a fractal properties file named My Default Fractal.xml in the Fractal Science Kit Home folder. See the Save Fractal Properties command description for details on saving the fractal properties to a file. My Default Fractal.xml also controls the initial Fractal Window displayed when you start the Fractal Science Kit.
Mandelbrot Fractals
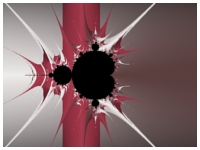
Max Dwell
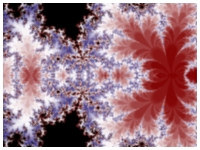
When the area around the Mandelbrot set seems imprecise, it can usually be corrected by increasing the number of iterations. The number of iterations is controlled by the Max Dwell property in the Orbit Generation section of the Mandelbrot / Julia / Newton page.
For example, the following image was generated with Max Dwell set to 16.
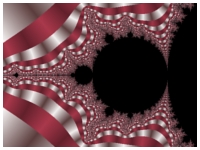
Increasing Max Dwell to 100 reduces the errors as shown below.
Of course, increasing Max Dwell also increases the time it takes to generate the sample data so you should try to increase Max Dwell only to the point where the visual errors are no longer present.
Note that the farther you zoom into a fractal, the higher you will need to set Max Dwell in order to get good results.
Cycle Detection
When increasing the number of iterations fails to correct the problem, it is possible that the errors are caused by Cycle Detection.
Cycle Detection is the process of checking for orbits that converge to a single point or fall into a repeating cycle of points, and terminating the fractal iteration early to improve performance. The downside is that Cycle Detection can incorrectly classify an orbit as having converged or fallen into a cycle which can cause areas of a Mandelbrot fractal to be incorrectly filled with the background color. In most cases Cycle Detection will improve performance with only minor visual errors. However, in some cases, the visual errors can be severe. In rare cases, Cycle Detection can even introduce artifacts that look like lines/rectangles that seem to bleed to the right along horizontal lines.
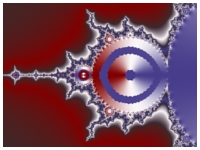
The following image was generated with Cycle Detection turned on.
Turning off Cycle Detection corrects the problem as shown in the following image.
If you are coloring the inside of the Mandelbrot set, Cycle Detection will almost always yield undesirable results.
The image above was generated with Cycle Detection turned on. As you can see the inside coloring is fraught with inaccuracies.
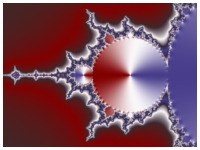
Turning off Cycle Detection corrects the problem as seen above.
It is recommended that you turn off Cycle Detection when generating your final image.
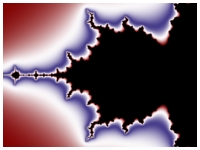
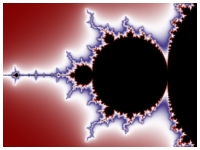
Bailout
If you see parts of the image that appear chopped off, it may be that the Bailout in the Orbit Generation section of the Mandelbrot / Julia / Newton page is set too low.
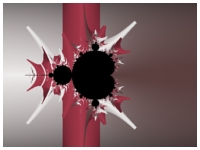
For example, the image above was generated using the default Bailout of 256.
By increasing Bailout to 1e12, the problem is corrected.
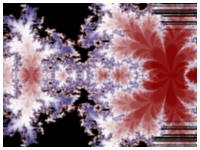
While on the subject of Bailout, when you color a fractal based on each sample's Angle as is done by the Classic Controllers Gradient Map - Atan 1 and Gradient Map - Atan 2, the Bailout can have a dramatic effect on the final image.
The image above was generated using a Bailout of 256.

The image above was generated using a Bailout of 4.
Newton Fractals
Root Detection
Root Detection is not applicable (and automatically disabled) for Mandelbrot fractals. However, a common approach when exploring a Newton based Mandelbrot, is to activate Root Detection and use a controller like Gradient Map - Newton to color the Mandelbrot fractal. Then use the Preview Julia feature to explore different Julia fractals by clicking on the Mandelbrot to define the Julia Constant for the preview. The Mandelbrot will be displayed using shades of a single color since the controller uses Sample.RootIndex to color the fractal and it is 0 for all samples (the shading is due to 3D processing), but the Julia Preview will be rendered in full color based on the roots found during Root Detection.
For example, here is a Newton Mandelbrot displayed with Root Detection turned on and colored using the Gradient Map - Newton controller.
The following image was generated by activating Preview Julia and clicking on the image to set the Julia Constant for the preview. After the Julia Preview was displayed, I clicked on the image in the Preview Window to open the Julia fractal in its own Fractal Window.

Orbit Traps
Solid Guessing and Anti-Alasing
Solid Guessing can cause squiggly off-color lines along the intersection of orbit traps. The lines are composed of large square blocky pixels. These artifacts can be eliminated by turning off Solid Guessing.
The following image illustrates the visual errors resulting from Solid Guessing.
Turning off Solid Guessing eliminates these errors as shown below.

Since this will increase the time required to generate the fractal, it is recommended that you wait until you are ready to generate your final image to turn off Solid Guessing (or turn on Anti-Aliasing which automatically turns off Solid Guessing).
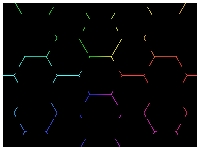
Solid Guessing can cause thin lines within a trap to be broken up or missing. The following image is of a Hexagon Grid trap with Line Width set to 0.012 and Solid Guessing set to 4x4 Box. Notice how many of the grid lines are broken up or missing altogether.
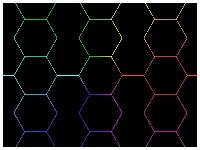
If we turn off Solid Guessing, the image improves but some of the grid lines are still missing. This is due to the placement of the grid lines relative to the sample points; i.e., the missing grid lines fall entirely between the sample points so they are not trapped.
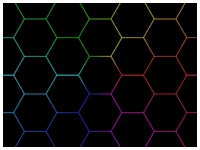
If we turn on Anti-Aliasing by setting Oversampling to 3x3 Oversampling, the problem is eliminated because the grid lines no longer fall entirely between the sample points since the distance between sample points is much smaller.
Trap Delta Map
If you are working with an Orbit Trap program that sets the trappedPoint.Delta, and you want to use the trap's delta value in your Color Controller, you will need to set the Trap Delta Map property to Trap Delta in the Orbit Trap Map section of the Orbit Trap Map page. The default setting, Combined Index, is not useful for coloring.
If you are using a Symmetry Transformation to transform an orbit trap, and you want to access the symmetry index in your Color Controller, you will need to set either Trap Index Map or Trap Delta Map to Symmetry Index in the Orbit Trap Map section of the Orbit Trap Map page.
Orbital Fractals
Orbital fractals frequently result in an image that appears grainy or speckled. This is a natural result of the algorithm used to create them. You can reduce these artifacts by increasing the number of points in the orbit but this can lead to significant increases in the time required to produce the fractal. The number of points in the orbit is controlled by the Max Count property on the Orbital / IFS / Strange Attractor page.
Two additional methods are available to improve the results:
- Anti-Aliasing is a method used to improve the quality of the fractal image by oversampling the fractal and then averaging the results. Since Orbital fractals do not generate an orbit per sample as do Mandelbrot fractals, Anti-Aliasing does not result in as severe a time penalty as with Mandelbrot fractals, and it is recommended that you set Oversampling to one of the higher settings when exploring Orbital fractals since the increased quality outweighs the cost.
- Adaptive Smoothing tries to reduce speckling by blurring the image using a low-pass filter. The strength of the filter decreases as the density of the sample increases so blurring is minimized where the samples are well represented.
The following IFS fractal was generated with Oversampling set to <None> and Adaptive Smoothing off.
Next, we set Oversampling to 3x3 Oversampling and turn on Adaptive Smoothing.